 mysql 赋给用户权限 grant all privileges on
 2010/09/27 02:03 | by 刘新修 ]
遇到了 SQLException: access denied for @'localhost' (using password: no)
解决办法 grant all privileges on *.* to joe@localhost identified by '1';
flush privileges;
拿 joe 1 登陆
附:
mysql> grant 权限1,权限2,…权限n on 数据库名称.表名称 to 用户名@用户地址 identified by ‘连接口令’;
权限1,权限2,…权限n代表select,insert,update,delete,create,drop,index,alter,grant,references,reload,shutdown,process,file等14个权限。
当权限1,权限2,…权限n被all privileges或者all代替,表示赋予用户全部权限。
当数据库名称.表名称被*.*代替,表示赋予用户操作服务器上所有数据库所有表的权限。
用户地址可以是localhost,也可以是ip地址、机器名字、域名。也可以用’%'表示从任何地址连接。
‘连接口令’不能为空,否则创建失败。
mysql>grant select,insert,update,delete,create,drop on vtdc.employee to joe@10.163.225.87 identified by ‘123′;
给来自10.163.225.87的用户joe分配可对数据库vtdc的employee表进行select,insert,update,delete,create,drop等操作的权限,并设定口令为123。
mysql>grant all privileges on vtdc.* to joe@10.163.225.87 identified by ‘123′;
给来自10.163.225.87的用户joe分配可对数据库vtdc所有表进行所有操作的权限,并设定口令为123。
mysql>grant all privileges on *.* to joe@10.163.225.87 identified by ‘123′;
给来自10.163.225.87的用户joe分配可对所有数据库的所有表进行所有操作的权限,并设定口令为123。
mysql>grant all privileges on *.* to joe@localhost identified by ‘123′;
给本机用户joe分配可对所有数据库的所有表进行所有操作的权限,并设定口令为123。
 Linux各个挂载点及其分区介绍
 2010/09/26 23:35 | by 刘新修 ]
本文介绍Linux常用分区挂载点常识以及桌面、服务器分区挂载点的推荐配置,当然这个配置是天缘自己写的,分区大小这个话题是仁者见仁智者见智,欢迎大家一起交流这个话题,比如WEB服务、邮件服务、下载服务等,我们一起交流哪种类型服务下某挂载点应该加大就可以了,至于是否独立就看个人的了。
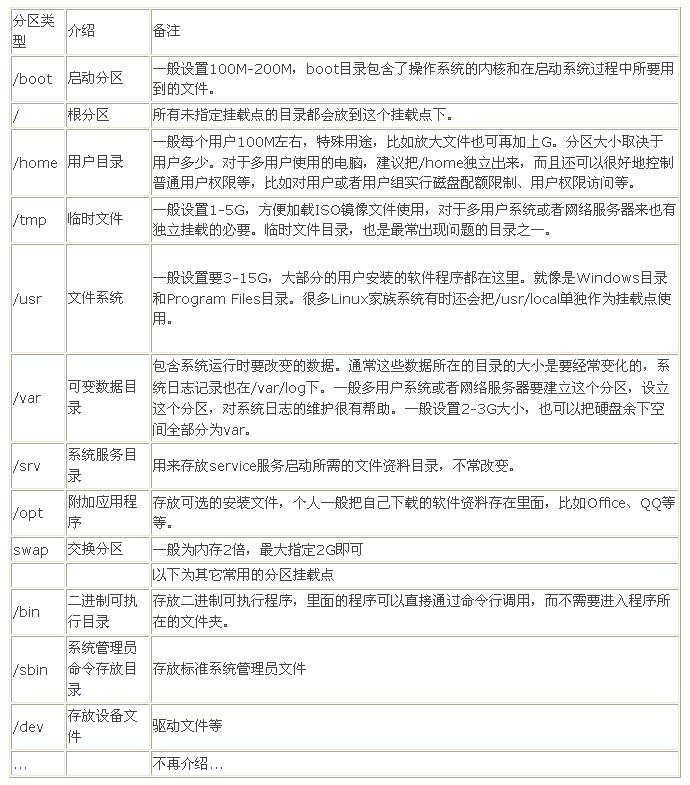
一、Linux分区挂载点介绍
Linux分区挂载点介绍,推荐容量仅供参考不是绝对,跟各系统用途以及硬盘空间配额等因素实际调整:
当然上面这么多挂载点,实际上是没有比较每个目录都单独进行挂载,我们只需要根据自己的实际使用需要对个别目录进行挂载,这样系统结构看起来也会精简很多。
一般来讲Linux系统最少的挂载点有两个一个是根挂载点/,另一个是swap,虽然swap也可以采用其他方式类似方式替代,但从使用角度,天缘认为没这个必要,把swap单独设置一个挂载点似乎对Linux系统的标准性更好支持。
二、Linux系统桌面、服务器分区推荐方案
下面以80G独立硬盘安装Ubuntu为例,列一下简单的分区方案。
1、普通桌面用户推荐分区方案(示例:80G桌面用户):
2、服务器用户推荐分区方案一(示例:80GWEB服务器用户,用户程序与系统程序合用usr):
2、服务器用户推荐分区方案二(示例:80GWEB服务器用户,用户程序与系统程序分用opt和usr):
分区方案关键点:
——大数据库一般要加大/usr挂载点
——多用户、下载类、多存储文件等要加大/home挂载点
——文件小,用户多要注意/tmp和/var挂载点大小
linux中,磁盘分区是一个物理概念,挂载点及其文件系统是一个逻辑概念,挂载是针对物理上的硬盘或其他存储空间。将某一存储介质挂载到文件系统,实际上就是相当于给许多门,分配门牌号码。
sda3挂载在/home上面,现在需要将sda9挂载在/home/pt/Videos上面
sudo mount /dev/sda9 /home/pt/Videos
sudo chmod 777 /home/pt/Videos 也可以sudo chmod 777 /dev/sda9
如果不设置这个文件夹或者磁盘的权限为777(任何人都有读写执行权),会出现各种问题
1、进入 /home/pt/Videos鼠标邮件的粘帖及其许多功能键无法使用,只能sudo cp,sudo mv方式操作文件
2、无法使用gedit等软件保存文件到/home/pt/Videos ,等各种问题
sudo mount /dev/sda9 /home/pt/Videos后,会出现以前/home/pt/Videos上有的文件,现在无法看见的情况,这是符合逻辑的,/home/pt/Videos以前同/home一起挂载在sda3上,现在将sda3挂载到另外一个地方,打开sda3就可以看见一个名为的/home/pt/Videos文件夹,上面有以前的文件。
linux可以做到:
一个分区设置多个挂载点
多个分区设置一个挂载点。
1.一个分区设置多个挂载点
pt@pt-laptop:~$ sudo mount /dev/sda8 /mnt
pt@pt-laptop:~$ sudo mount /dev/sda8 /home/pt/Videos
pt@pt-laptop:~$ sudo chmod 777 /mnt
pt@pt-laptop:~$ sudo chmod 777 /home/pt/Videos
此时,如果复制一个文件test到 /home/pt/Videos ,打开/mnt 也可以看见,此时test在两个逻辑分区上,只在一个物理分区上,如果在/mnt 删除test文件,打开/home/pt/Videos 也看不见了,如果在/home/pt/Videos复制一个test1,在/mnt中也可以看见,在/home/pt/Videos删除test1,在/mnt中也消失。
道理显而易见,/home/pt/Videos ,/mnt对应同一个物理区域,针对此物理区域的操作,两个逻辑区域由于对应同一物理区域的缘故,一个逻辑区域变动导致另一个逻辑区域也反应出同样的变动。
参见附件。
2.多个分区同一个挂载点
pt@pt-laptop:~$ sudo mount /dev/sda9 /mnt/sda9
pt@pt-laptop:~$ sudo mount /dev/sda10 /mnt/sda10
pt@pt-laptop:~$sudo cp /home/pt/test /mnt
此时的test文件在哪个物理分区上呢,此时test只在一个逻辑分区上,/home/pt/test。
通过下面的命令,依次打开sda8,sda9,sda10,可以发现,它在最后一个挂载的分区sda10上面。
pt@pt-laptop:~$ sudo mkdir /mnt/sda8 /mnt/sda9 /mnt/sda10
pt@pt-laptop:~$ sudo mount /dev/sda8 /mnt/sda8
pt@pt-laptop:~$ sudo mount /dev/sda9 /mnt/sda9
pt@pt-laptop:~$ sudo mount /dev/sda10 /mnt/sda10
 Linux 开机启动[root@localhost]变成bash-3.2#解决方法
 2010/09/25 16:17 | by 刘新修 ]
我只是记录一下命令,这个就可以搞定。
source .bashrc
login as: root
root@*****218’s password:
Last login: Thu Jul 1 22:06:47 2010 from 110.203.60.70
-bash-3.2# copy /etc/skel/.bashrc ~
-bash: copy: command not found
-bash-3.2# cp /etc/skel/.bashrc ~
-bash-3.2# source ~/.bashrc
[root@**** ~]#
不同的shell可以去切换:例:
[root@localhost ~]# bash
bash-3.2# sh
sh-3.2# tcsh
[root@localhost ~]# bash
bash-3.2# csh
[root@localhost ~]#
 ERROR 2002 (HY000): Can't connect to local MySQL server through socket
 2010/09/25 15:15 | by 刘新修 ]
ERROR 2002 (HY000): Can't connect to local MySQL server through socket '/usr/local/mysql/tmp/mysql.sock' (2)
--------------------------------------------------------------------------------
此类问题如,mysql.sock' 确实存在,请给mysql用户在tmp文件夹的足够权限!
 用yum下载rpm包
 2010/09/22 18:45 | by 刘新修 ]
 Linux压力测试工具webbench的安装使用介绍
 2010/09/19 00:50 | by 刘新修 ]
webbench文件下载:
http://at.liuxinxiu.com/2010/09/file/webbench-1_5_tar.gz
1、适用系统:Linux
2、编译安装:
- # wget ←下载源程序
- # tar zxvf webbench-1.5.tar.gz ←解压源文件
- # make ←编译程序
- # mkdir /usr/local/man ←建立相应目录(否则导致无法正常安装)
- # make install ←安装程序
使用方法/
webbench -c 500 -t 30 http://127.0.0.1/test.jpg
测试结果:
- # Webbench - Simple Web Benchmark 1.5
- # Copyright (c) Radim Kolar 1997-2004, GPL Open Source Software.
- # Benchmarking: GET http://127.0.0.1/test.jpg
- # 500 clients, running 30 sec.
- # Speed=3230 pages/min, 11614212 bytes/sec.
- # Requests: 1615 susceed, 0 failed.
webbench最多可以模拟3万个并发连接去测试网站的负载能力
yum -y remove httpd 如何默认有APACHE先卸载APACHE
spawn-fcgi是一个小程序,这个程序的作用是管理fast-cgi进程,功能和php-fpm类似
先YUM查找需要的库:
- yum -y install gcc gcc-c++ make imake autoconf automake
-
- yum -y install gcc gcc-c++ openssl openssl-devel pcre pcre-devel gdbm gdbm-devel libpng libpng-devel libjpeg-6b libjpeg-devel-6b freetype freetype-devel gd gd-devel zlib zlib-devel libXpm libXpm-devel ncurses ncurses-devel libmcrypt libmcrypt-devel libxml2 libxml2-devel libtool-ltdl libtool-ltdl-devel curl-devel
-
由于mysql编译比较慢我用yum安装了
yum -y install mysql-server mysql-devel
----------------------------------------------------------------------------------------------------
wget http://www.nginx.org/download/nginx-0.8.32.tar.gz
ls
tar zxvf nginx-0.8.32.tar.gz
cd nginx-0.8.32
- groupadd www
- useradd -g www -s /sbin/nologin -d /dev/null www
- ./configure --user=www --group=www --prefix=/usr/local/nginx --with-http_stub_status_module --with-http_ssl_module
- make && make install
- cd /usr/local/nginx/conf
- mv nginx.conf nginx.conf.bak
vim nginx.conf
=====================================================
- user www www;
-
- worker_processes 8;
-
- error_log logs/error.log crit;
-
- pid logs/nginx.pid;
-
- #Specifies the value for maximum file descriptors that can be opened by this process.
- worker_rlimit_nofile 65535;
-
- events
- {
- use epoll;
- worker_connections 65535;
- }
-
- http
- {
- include mime.types;
- default_type application/octet-stream;
-
- #charset gb2312;
-
- server_names_hash_bucket_size 128;
- client_header_buffer_size 32k;
- large_client_header_buffers 4 32k;
- client_max_body_size 8m;
-
- sendfile on;
- tcp_nopush on;
-
- keepalive_timeout 30;
-
- tcp_nodelay on;
-
- fastcgi_connect_timeout 300;
- fastcgi_send_timeout 300;
- fastcgi_read_timeout 300;
- fastcgi_buffer_size 64k;
- fastcgi_buffers 4 64k;
- fastcgi_busy_buffers_size 128k;
- fastcgi_temp_file_write_size 128k;
-
- gzip on;
- gzip_min_length 1k;
- gzip_buffers 4 16k;
- gzip_http_version 1.0;
- gzip_comp_level 2;
- gzip_types text/plain application/x-javascript text/css application/xml;
- gzip_vary on;
-
- include /usr/local/nginx/conf/vhosts/*.conf;
- }
-
========================================
mkdir vhosts
cd vhosts/
vim s157.com.conf
==============================
- server {
- listen 184.82.2.206:80;
- server_name s157.com www.s157.com;
-
- #log_format main '$remote_addr - $remote_user [$time_local] "$request" '
- # '$status $body_bytes_sent "$http_referer" '
- # '"$http_user_agent" "$http_x_forwarded_for"';
- #access_log /usr/local/nginx/logs/www.access.log;
- access_log off;
-
- location / {
- root /ftp/s157;
- index index.html index.htm index.php;
-
- location ~ .*.(gif|jpg|jpeg|png|bmp|swf)$ {
- expires 30d;
- }
-
- location ~ .*.(htm|html|js|css)$ {
- expires 1h;
- }
-
- }
-
- #error_page 404 =200 http://$host;
- #error_page 404 /404.html;
-
- location ~ .php$ {
- fastcgi_pass 127.0.0.1:9000;
- fastcgi_index index.php;
- fastcgi_param SCRIPT_FILENAME /ftp/s157/$fastcgi_script_name;
- include fastcgi_params;
- }
-
-
- }
-
- =================================
- 其中 可有可无 功能是防盗链的
- location ~* .(gif|jpg|png|swf|flv)$ {
- valid_referers none blocked abc.com www.abc.com;
- if ($invalid_referer) {
- #rewrite ^/ http://www.abc.com/403.jpg;
- return 404;
- }
- }
- =============
然后 找了个针对 CentOS 的nginx重启控制脚本
chmod 755 nginx
cp nginx /etc/init.d/
/etc/init.d/nginx restart 测试能不能成功 启动 !!!!!!!!!!!!!
 LIUXINXIU.COM - 定于凌晨3:30分,本站VPS自动重启设置/
 2010/09/18 03:48 | by 刘新修 ]
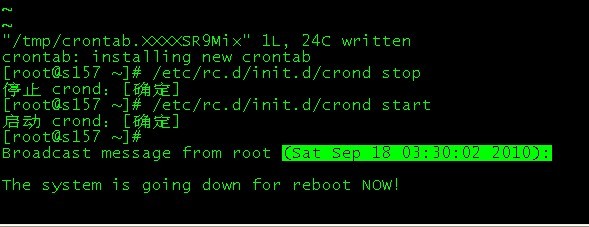
# crontab -e
30 3 * * * /sbin/reboot
# /etc/rc.d/init.d/crond stop
# /etc/rc.d/init.d/crond start
----------------------------------------------------------
之后就不用理睬,每天凌晨3:30分会自动重启一次!如果不需要自动重启,删除红色的内容。重启CROND//
时间到了3:30分 VPS--SSH 自动断开。。。。
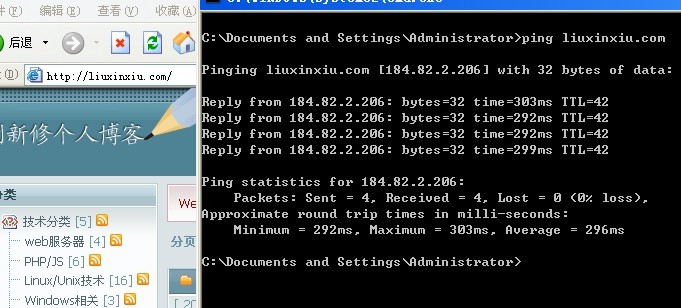
共5分钟完成重启,页面访问恢复正常。。。。。。如下:
-----------------------------------------------------------------------------------------------------------------------------------------------------
其他相关资料:
查看/修改Linux时区和时间
一、时区
1. 查看当前时区
date -R
2. 修改设置时区
方法(1)
tzselect
方法(2) 仅限于RedHat Linux 和 CentOS
timeconfig
方法(3) 适用于Debian
dpkg-reconfigure tzdata
3. 复制相应的时区文件,替换系统时区文件;或者创建链接文件
cp /usr/share/zoneinfo/$主时区/$次时区 /etc/localtime
在中国可以使用:
cp /usr/share/zoneinfo/Asia/Shanghai /etc/localtime
二、时间
1、查看时间和日期
date
2、设置时间和日期
将系统日期设定成1996年6月10日的命令
date -s 06/22/96
将系统时间设定成下午1点52分0秒的命令
date -s 13:52:00
3. 将当前时间和日期写入BIOS,避免重启后失效
hwclock -w
三、定时同步时间
* * * * * /usr/sbin/ntpdate 210.72.145.44 > /dev/null 2>&1
=====================================================
 VPS修复系统默认美洲时间更改为:中国上海
 2010/09/18 03:27 | by 刘新修 ]
凌晨3点设置了一个VPS自动重启脚本,本地虚拟机测试无误,晕@ 美国VPS无效,在本地做了测试,才发现是市区的问题。
本人VPS托至美国,新机自然是以美洲时间为标准,总是感觉不爽,比如设置系统自动定时重启等等////
服务器自动重启:http://liuxinxiu.com/s/54/
显示的国内的时间为凌晨3:01
美国VPS系统显示的时间为下午13:00
更新为中国--上海 时区之后,时间已经校正如下@!
 LINUX服务器定时重启设置方法
 2010/09/18 02:27 | by 刘新修 ]
为了保证LINUX系统的稳定运行,及时释放内存资源,CENTNET建议每台基于LINUX的CMC服务器,均每天设置定时重启功能.具体操作方法如下:
使用SSH工具成功登陆后台后,运行如下命令:
crontab -e
然后在文档中根据需要插入如下内容:
0 4 * * * /sbin/reboot ( 0 2表示每天凌晨两点重启.. 0 3表示凌晨3点..)
06 2 * * * /sbin/reboot ( 06 2表示每天凌晨两点零六分重启.. 06 3表示凌晨3点零6分..)
0 4 * * * /sbin/reboot ( 0 4表示每天凌晨四点重启.. 0 3表示凌晨3点..)
:wq保存退出后,执行如下命令重启crond 服务即可.
/etc/rc.d/init.d/crond stop
/etc/rc.d/init.d/crond start
-------------------------------------------------------------------------------------------------
设置系统时钟的操作:
# date 月日时分年.秒
例如:
# date 091713272003.30


