


 【原创】 图形界面方式安装debian系统,图文教程。
debian 版本:debian-506-i386
配置:内存256MB (建议最小使用256MB) 硬盘8GB (如安装桌面环境,硬盘最小保证4.5GB)
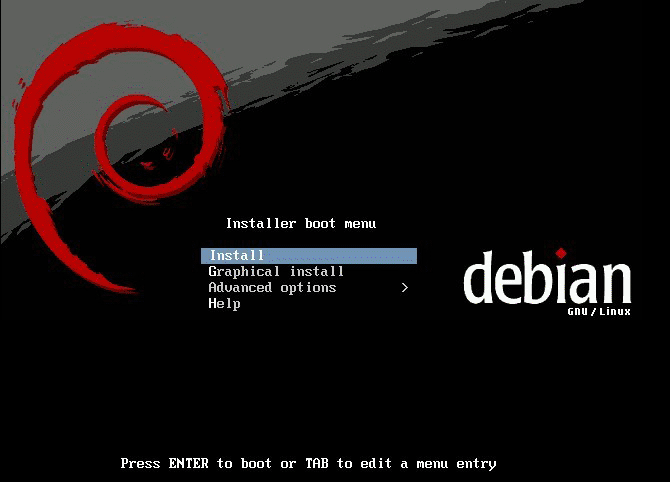
选择以图形界面的方式安装debian:
Graphical install
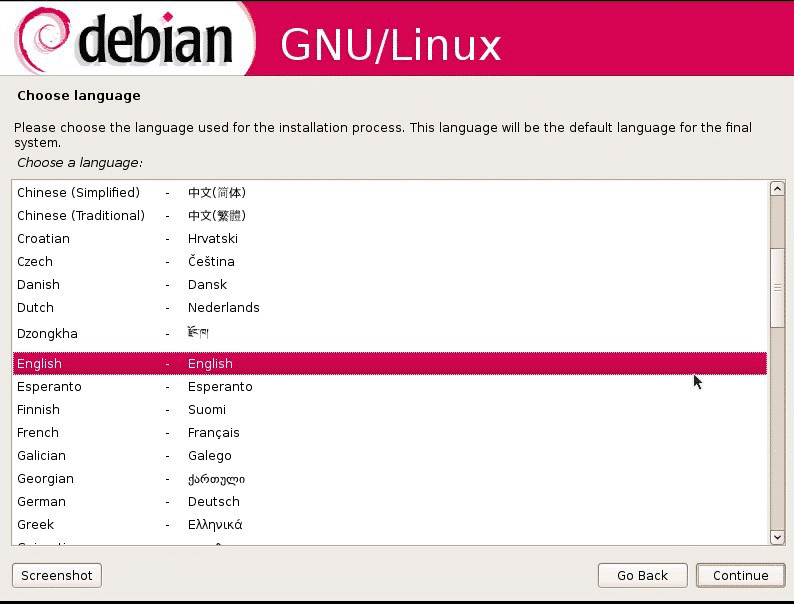
使用方向键↑选择:Chinese(Simplified) - 中文(简体) 【点击Continue】
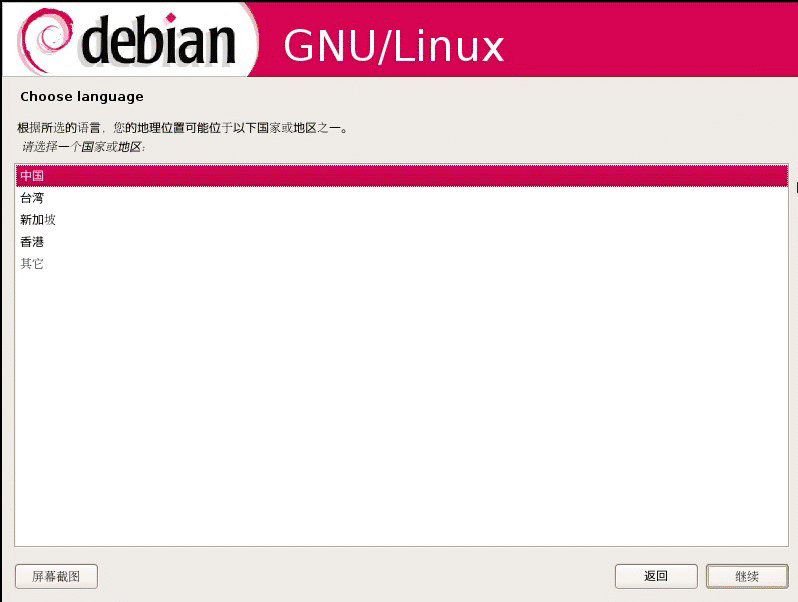
默认为:中国 【点击继续】
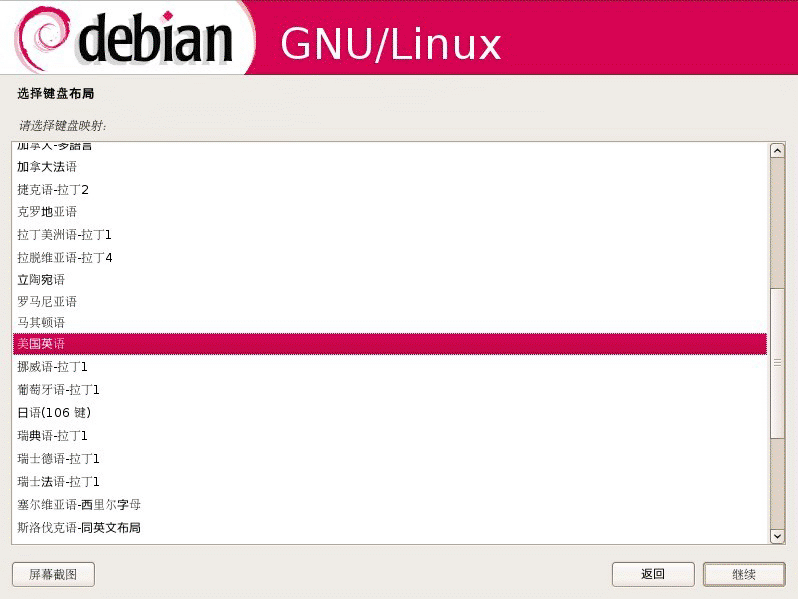
键盘布局默认为:美国英语 【点击继续】
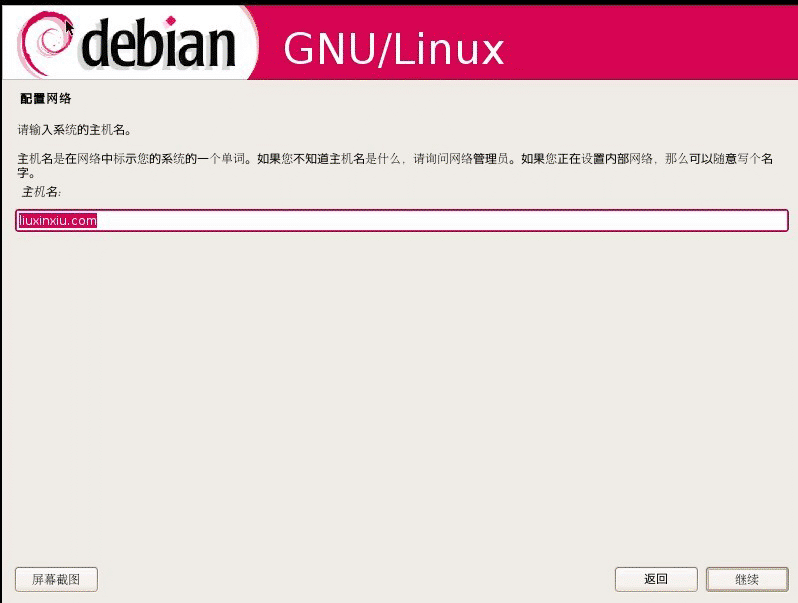
填写你的主机名称:liuxinxiu.com 等。。。。 【点击继续】
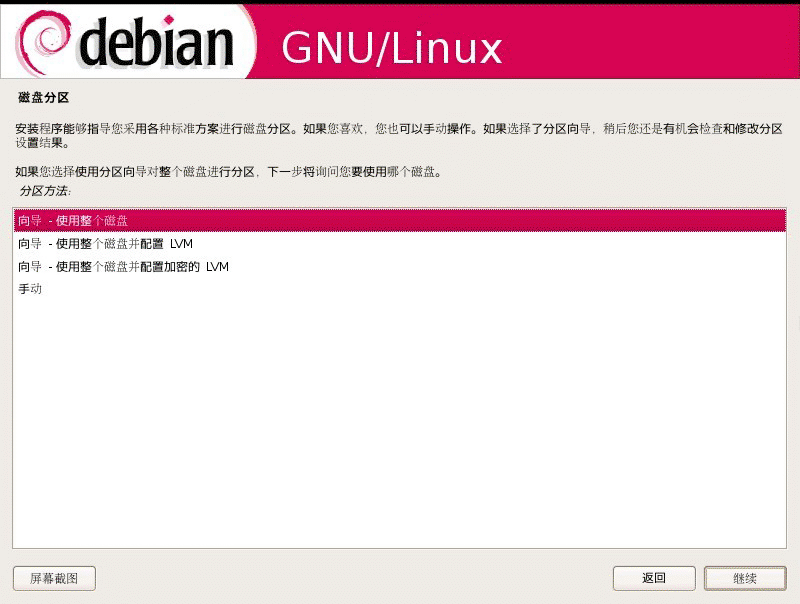
分区方法:默认向导--使用整个磁盘 【点击继续】

请选择要分区的磁盘:默认选中当前磁盘 【点击继续】
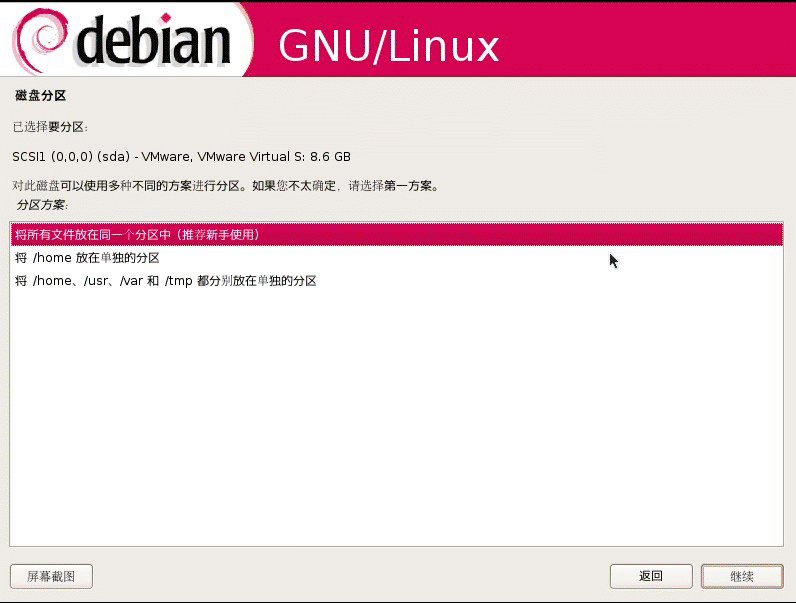
分区方案建议使用:将所有文件放在同一个分区中(推荐新手使用)
此方案 /home /etc /usr /var /tmp 等系统下所有文件夹将处于同一磁盘空间下。
如有特殊需要选择 第2或者第3
【点击继续】
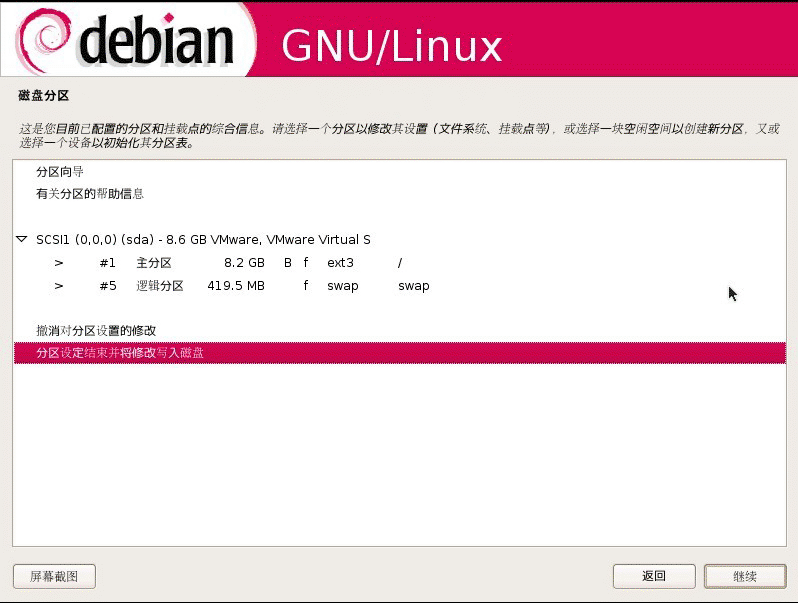
提醒你系统将写入你选择的磁盘空间:默认 【点击继续】
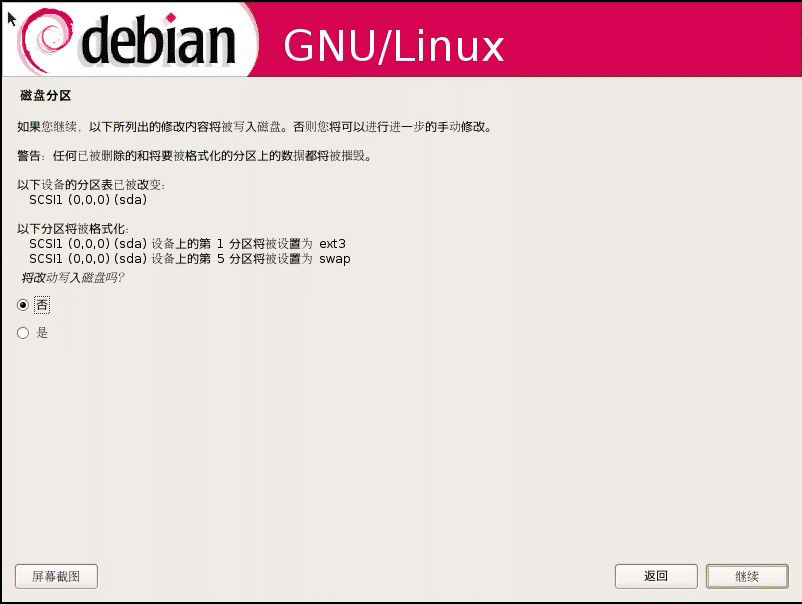
写入磁盘前再次提醒您:选择(是) 【点击继续】
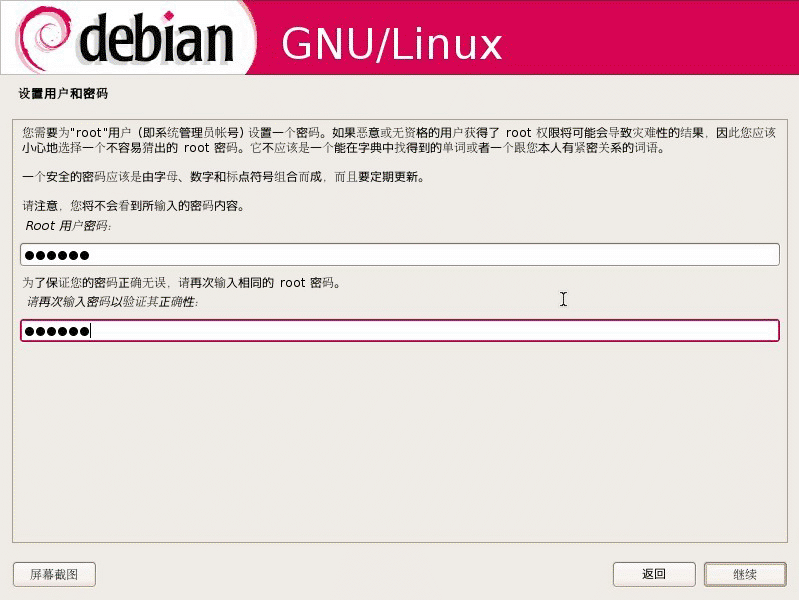
设置系统超级管理用户 Root 的密码: 输入密码、再次重复输入密码 【点击继续】
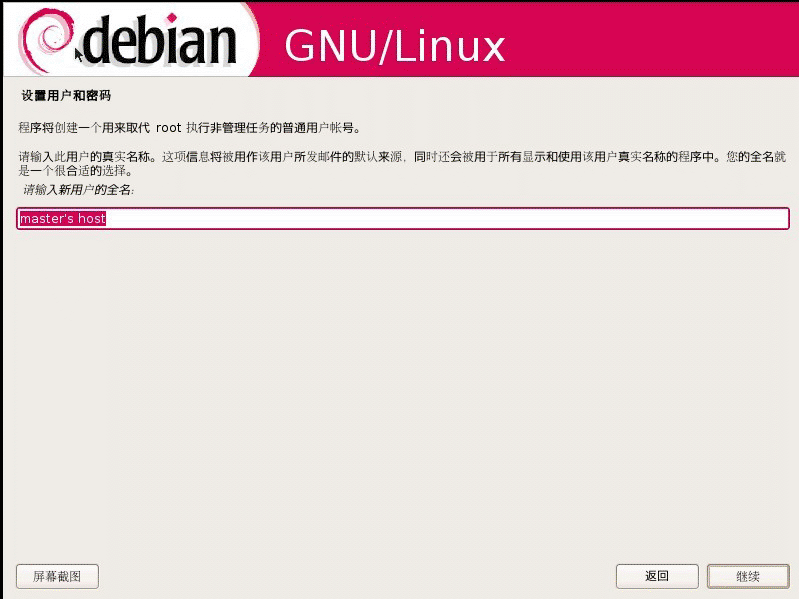
设置系统普通用户全名称: 例(master's host) 【点击继续】
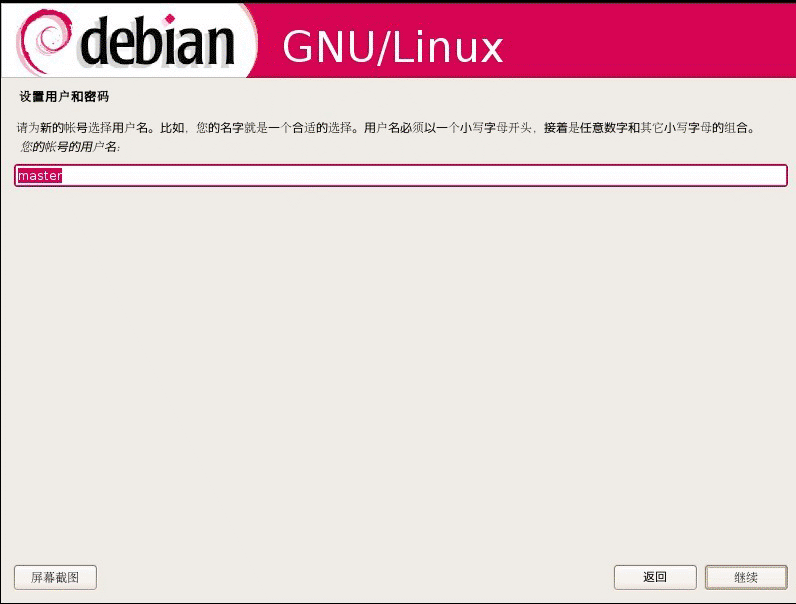
设置系统普通用户名称:master 【点击继续】
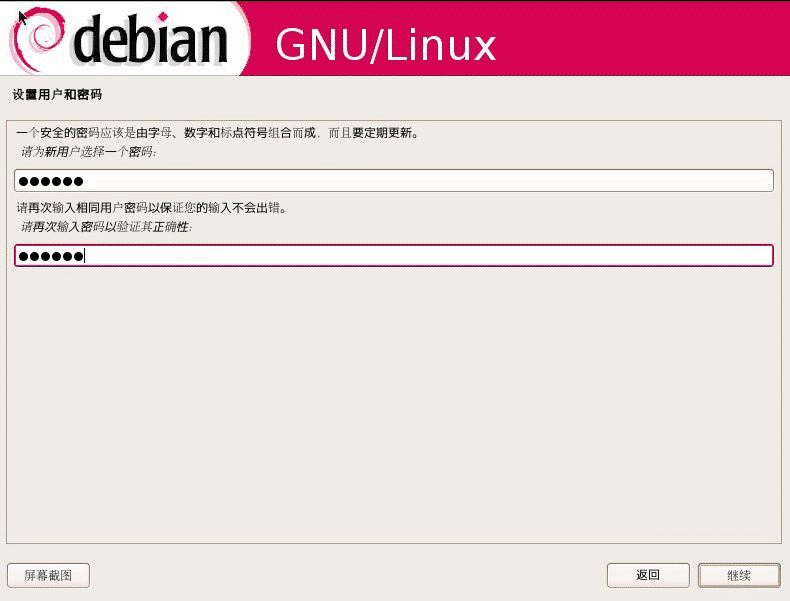
设置系统普通用户密码: 输入密码、再次重复输入密码 【点击继续】
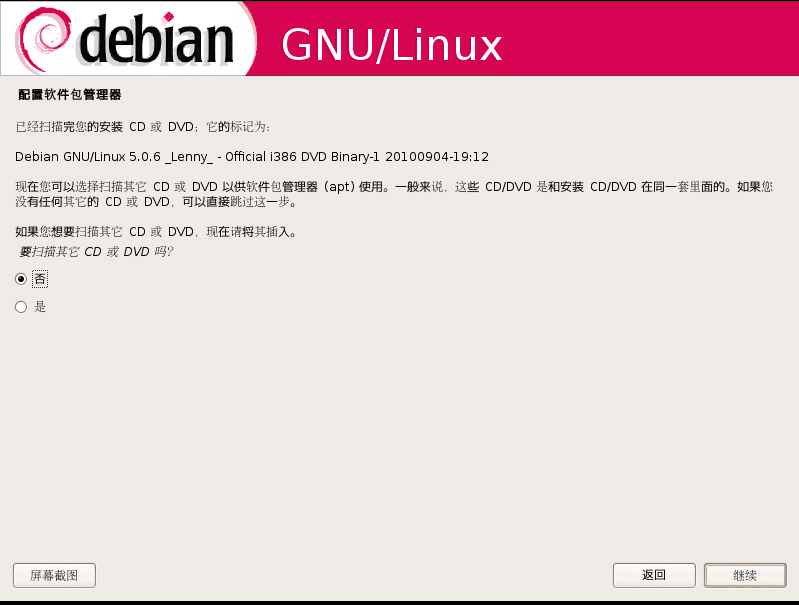
是否扫描CD 或 DVD :选择(否) 【点击继续】
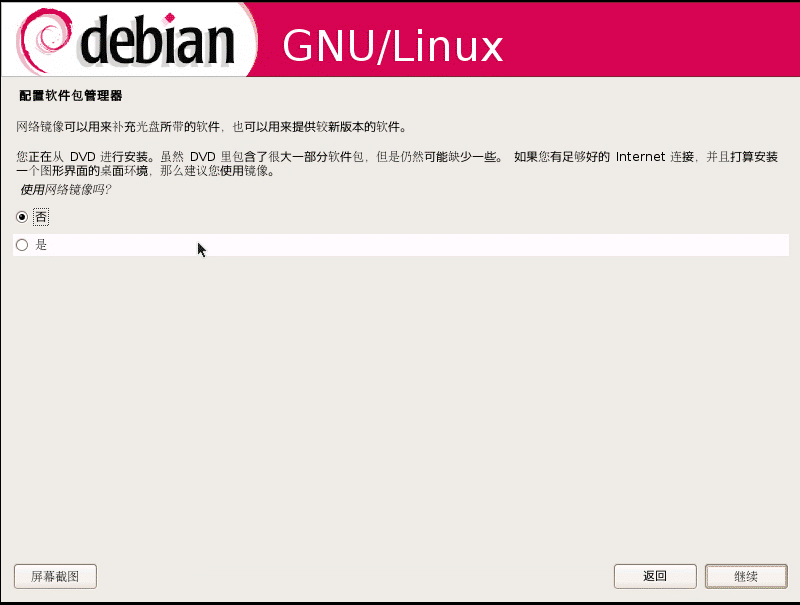
是否使用网络镜像:选择(否) 【点击继续】

是否参与软件包调查:选择(否) 【点击继续】
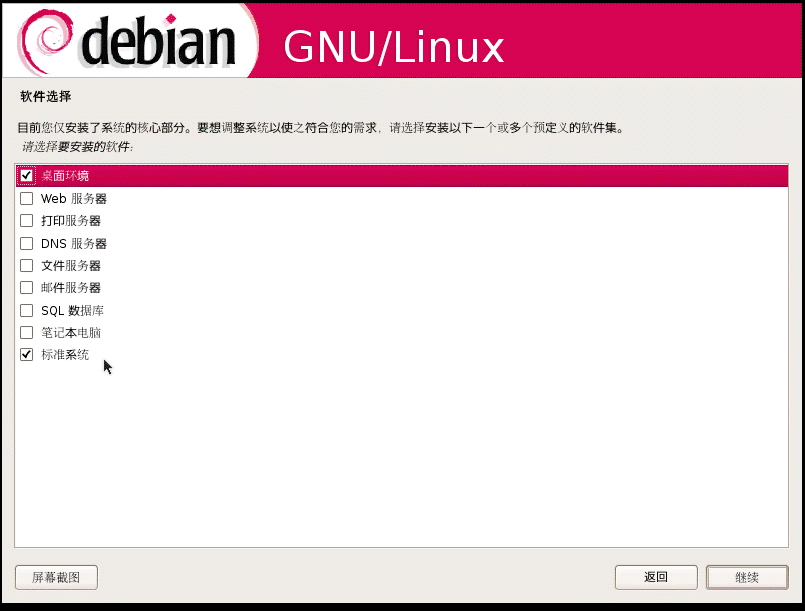
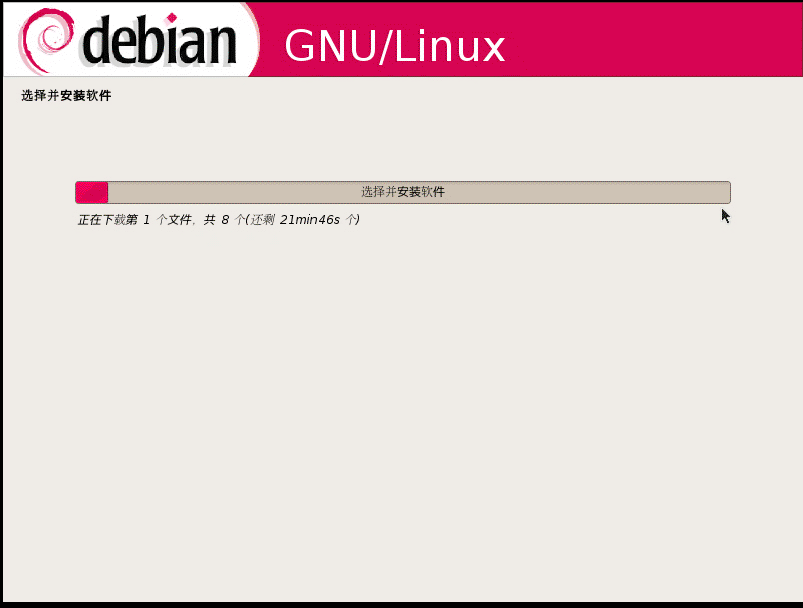
选择安装系统内置的一些环境:默认选择 ----桌面环境+标准系统 即可,如需要安装Webserver 选上Web 服务器 。如需要最小化安装的话----去掉-----桌面环境+标准系统---前的对勾!【点击继续】
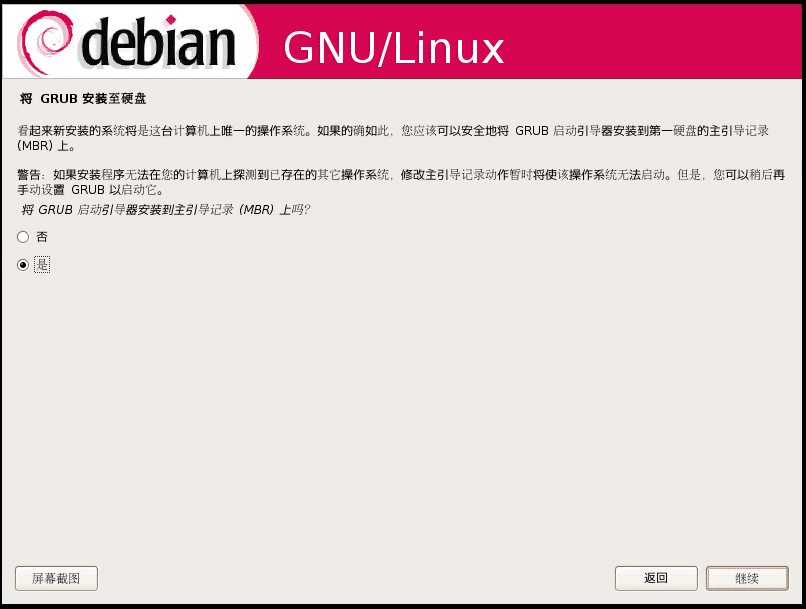
询问是否将GRUB 启动引导器安装到主引导记录(MBR)上:选择(是) 【点击继续】
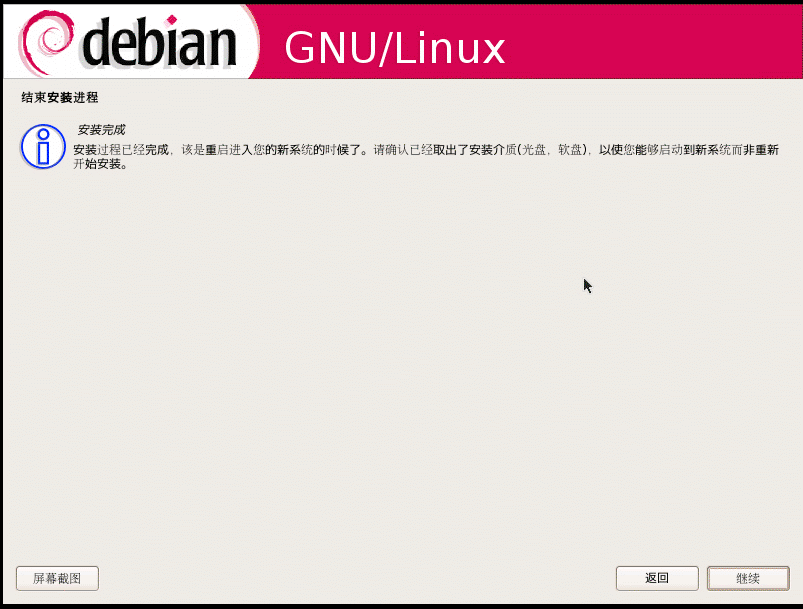
安装完成! 【点击继续】 重新引导系统 -------
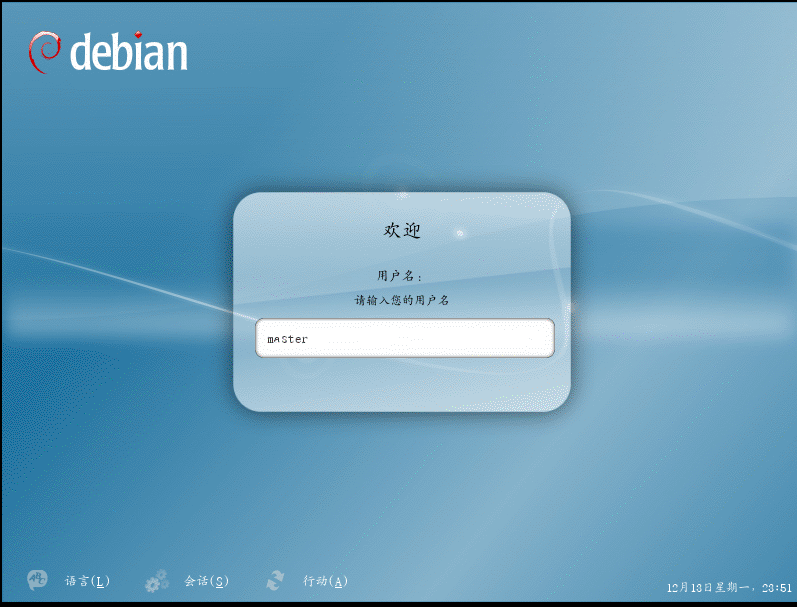
-------重新引导系统 -------后进入登入界面------ 使用master 用户登入!!
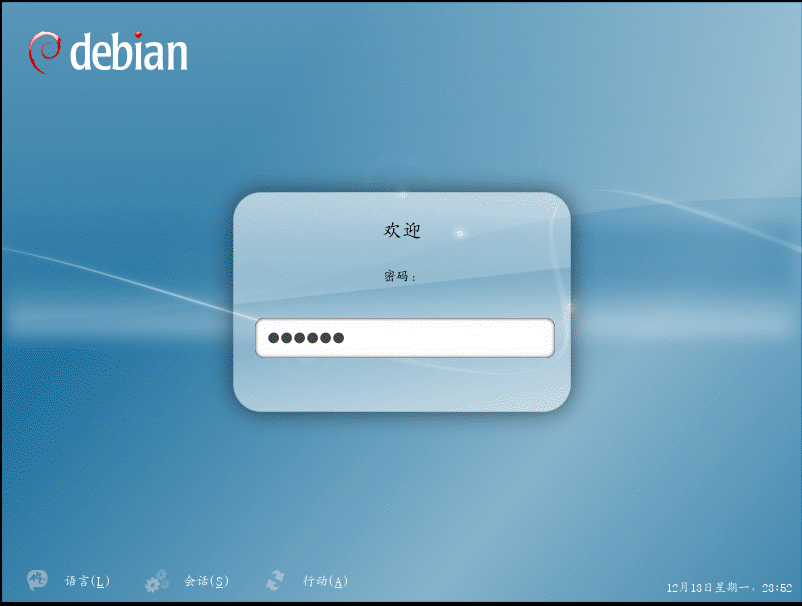
输入用户master 的密码:******
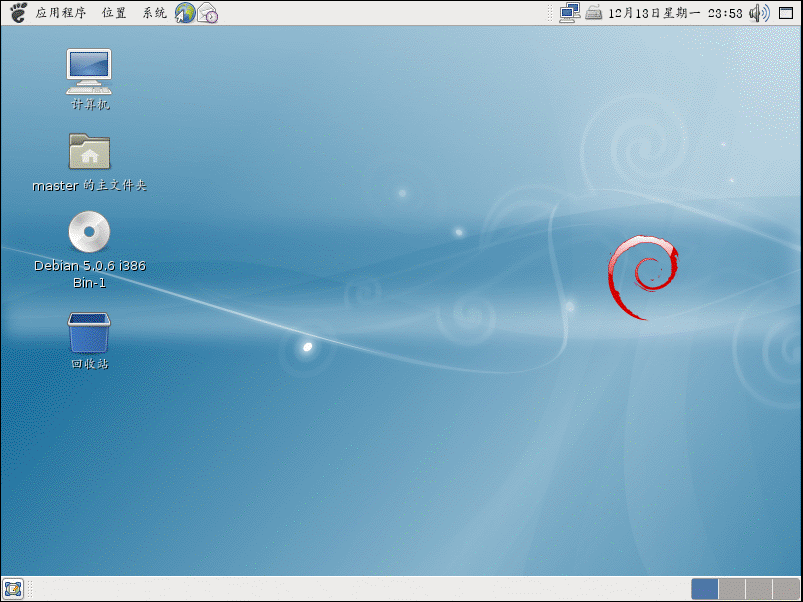
登入成功,进入系统 !!!!!!
===========================================================
转载请标明出处:http://liuxinxiu.com/

【转载】php-configure错误解决
configure: error: libjpeg.(a|so) not found
configure: error: libjpeg.(a|so) not found
ln -sf libjpeg.so.62.0.0 libjpeg.so
configure: error: libpng.(a|so) not found.
yum install libpng-devel
32位和64位的都装了。你可以强制删除两个包,再重装64位的包。
rpm --allmatches --nodeps
可能在config结束后会提示:
configure: error: libjpeg.(a|so) not found
configure: error: libjpng.(a|so) not found
错误,那么请在configure前执行如下的命令:
cp -frp /usr/lib64/libjpeg.* /usr/lib/
cp -frp /usr/lib64/libpng* /usr/lib/
因为php默认就在/usr/lib/下找相关库文件,而x64机器上是在:/usr/lib64
解决这个问题,首先确定你安装的 jpeg的x86_64的的安装位置
shell> updatedb
shell> locate libjpeg.so
看到已经安装位置
然后明白php参数的含义
根据php的配置参数
--with-jpeg-dir=/usr --with-libdir=lib64
--with-jpeg-dir=/usr :是确定jpeg的安装位置
--with-libdir=lib64 : 这个是一个全局参数,代表配置器寻找所有安装路径下的lib64目录,而不是默认安装路径下的lib目录
CentOS 5 常见的configure error的解决方法2009-10-20 10:23仅限于CentOS 5
configure: error: No curses/termcap library found
网上有的说法是:
--with-named-curses-libs=/usr/lib/libncursesw.so.5
其实是不对的,虽然能解决configure的错误,但是make的时候会提示错误,正确的做法应该是
yum -y install ncurses-devel
debian: apt-get install libncurses5-dev
configure: error: xml2-config not found
yum -y install libxml2-devel
debian:apt-get install libxml2-dev
configure: error: Cannot find OpenSSL's
yum -y install openssl-devel
configure: error: libjpeg.(a|so) not found
yum -y install gd
yum -y install gd-devel
debian:apt-get install libjpeg-dev
configure: error: libpng.(a|so) not found.
apt-get install libpng12-dev
configure: error: cannot find output from lex; giving up
yum -y install flex
configure: error: mod_deflate has been requested but can not be built due to prerequisite failures
yum -y install zlib-devel openssl-devel
debian:apt-get install zlib1g-dev
configure: error: libXpm.(a|so) not found.
apt-get install libxpm-dev
on
apt-get install libfreetype6-dev
configure: error: ...No recognized SSL/TLS toolkit detected
apt-get install libssl-dev
在x64的机器上编译PHP+GD的时候需要注意一下
Written by bixuan on 2007年04月12号 – 11:04
php编译常见错误大全Posted in linux相关 | 七月 22nd, 2009
1) Configure: error: xml2-config not found. Please check your libxml2 installation.
Solutions :
yum install libxml2 libxml2-devel (For Redhat & Fedora)
# aptitude install libxml2-dev (For ubuntu)
2) Checking for pkg-config… /usr/bin/pkg-config
configure: error: Cannot find OpenSSL’s
Solutions :
yum install openssl openssl-devel
3) Configure: error: Please reinstall the BZip2 distribution
Solutions :
yum install bzip2 bzip2-devel
4) Configure: error: Please reinstall the libcurl distribution -
easy.h should be in /include/curl/
Solutions :
yum install curl curl-devel (For Redhat & Fedora)
# install libcurl4-gnutls-dev (For Ubuntu)
5) Configure: error: libjpeg.(also) not found.
Solutions :
yum -y install gd
yum -y install gd-devel
yum install libjpeg libjpeg-devel
6) Configure: error: libpng.(also) not found.
Solutions :
yum install libpng libpng-devel
apt-get install libpng12-dev
7) Configure: error: freetype.h not found.
Solutions :
yum install freetype-devel
Configure: error: Unable to locate gmp.h
Solutions :
yum install gmp-devel
9) Configure: error: Cannot find MySQL header files under /usr.
Note that the MySQL client library is not bundled anymore!
Solutions :
yum install mysql-devel (For Redhat & Fedora)
# apt-get install libmysql++-dev (For Ubuntu)
10) Configure: error: Please reinstall the ncurses distribution
Solutions :
yum install ncurses ncurses-devel
11) Checking for unixODBC support… configure: error: ODBC header file ‘/usr/include/sqlext.h’ not found!
Solutions :
yum install unixODBC-devel
12) Configure: error: Cannot find pspell
Solutions :
yum install pspell-devel
13) configure: error: mcrypt.h not found. Please reinstall libmcrypt.
Solutions :
yum install libmcrypt libmcrypt-devel (For Redhat & Fedora)
# apt-get install libmcrypt-dev
14) Configure: error: snmp.h not found. Check your SNMP installation.
Solutions :
yum install net-snmp net-snmp-devel
15)开启LDAP服务还需要
yum -y install openldap-devel openldap-servers openldap-clients
16)configure: error: No curses/termcap library found
网上有的说法是:
–with-named-curses-libs=/usr/lib/libncursesw.so.5
其实是不对的,虽然能解决configure的错误,但是make的时候会提示错误,正确的做法应该是
yum -y install ncurses-devel (for redhat)
apt-get install libncurses5-dev(for debian)
17)configure: error: cannot find output from lex; giving up
yum -y install flex
18)configure: error: mod_deflate has been requested but can not be built due to prerequisite failures
yum -y install zlib-devel openssl-devel
debian:apt-get install zlib1g-dev
19)configure: error: libXpm.(a|so) not found.
apt-get install libxpm-dev
Centos-5.4下Webmin 的安装与使用
通过浏览器远程管理linux---webmin
Webmin是基于B/S(Browser/Server)模式的linux管理工具,可以进行linux的系统、服务器、网络、硬件、群集等管理,其界面友好,简明易用。只需通过浏览器,即可完成Linux的日常管理工作,是linux远程及本地管理的一把利剑。
http://www.webmin.com/download.html WEBMIN官方下载页面
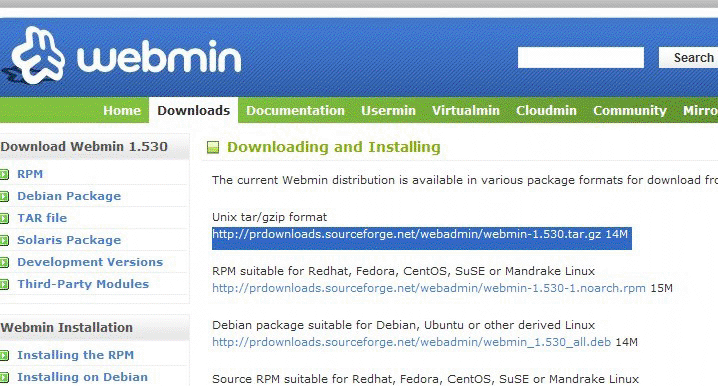
TAR.GZ官方下载地址:
Unix tar/gzip format
http://prdownloads.sourceforge.net/webadmin/webmin-1.520.tar.gz 14M
1、 webmin的安装与使用
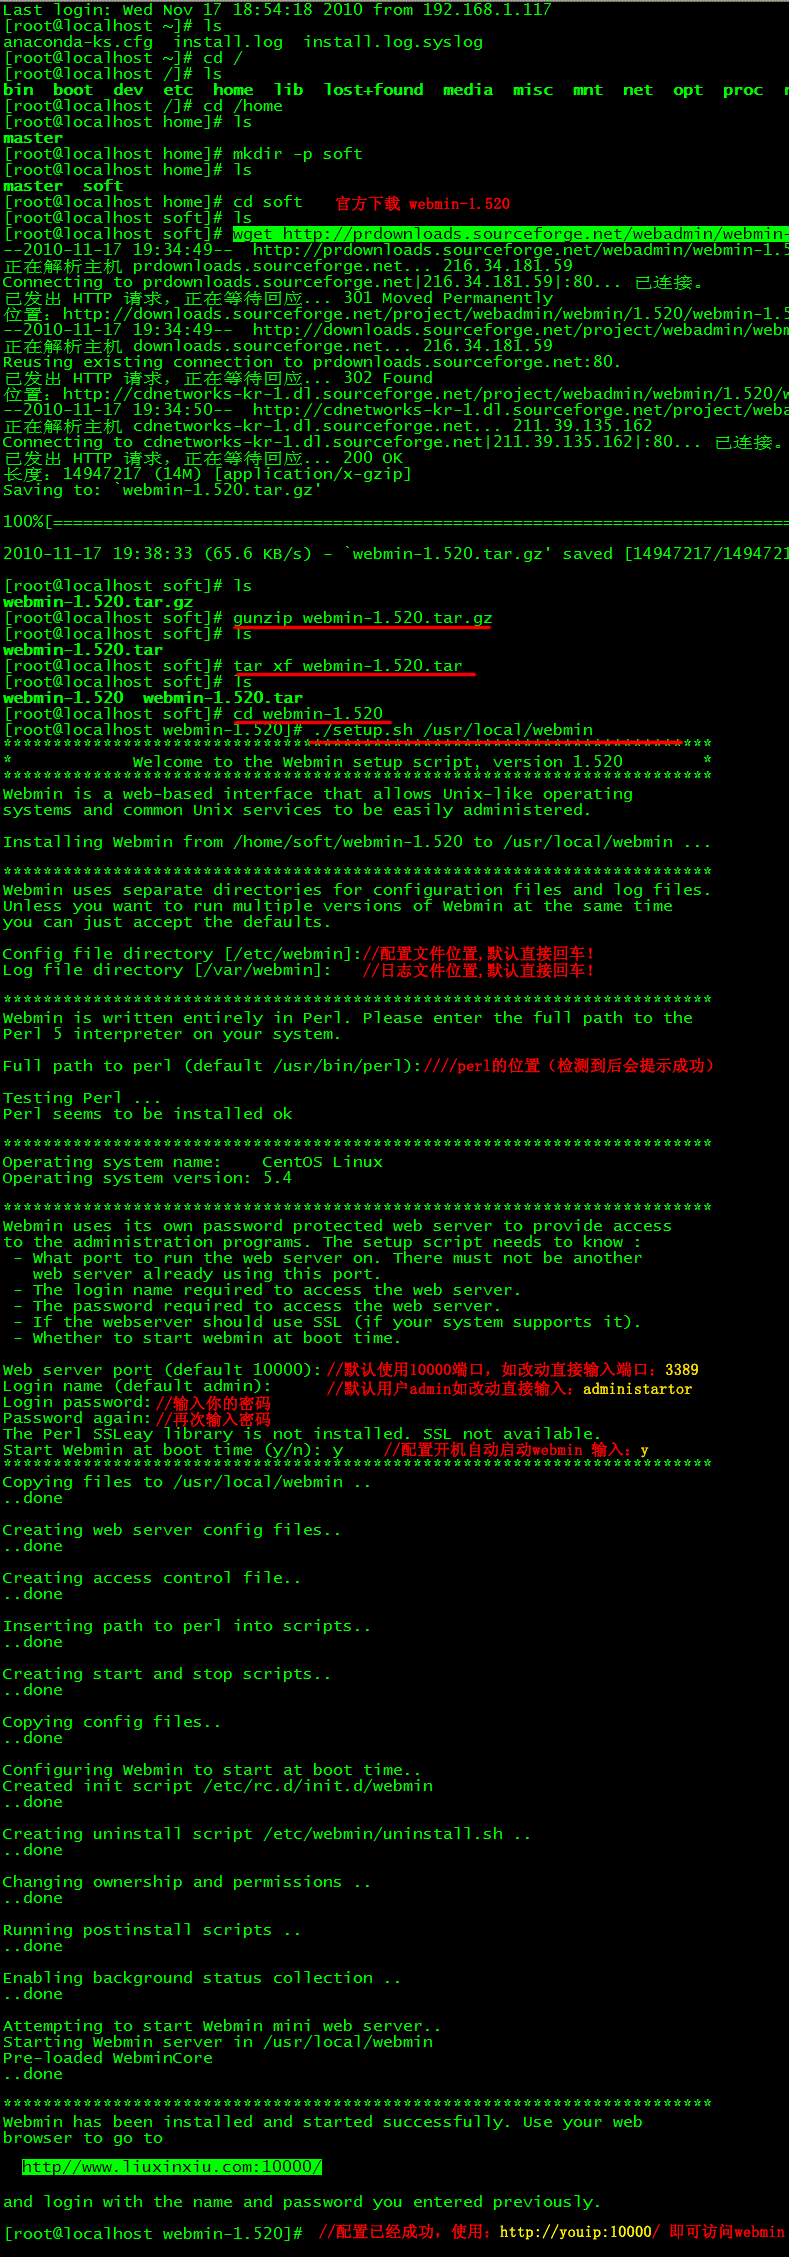
[root@yourhost /tmp]# gunzip webmin-1.520.tar.gz
[root@yourhost /tmp]# tar xf webmin-1.520.tar
[root@yourhost /tmp]# cd webmin-1.520
[root@yourhost /tmp/webmin-1.520]# ./setup.sh /usr/local/webmin
显示如下:
Config file directory [/etc/webmin]: //配置文件位置
Log file directory [/var/webmin]: //日志文件位置
Full path to perl (default /usr/bin/perl): //perl的位置(检测到后会提示成功)
Web server port (default 10000): //使用的端口(默认10000)
Login name (default admin): //登录名(默认admin)
Login password: //登录口令
Password again: //确认登录口令
Start Webmin at boot time (y/n): //是否在linux启动时自动启动webmin
上面所有提问,除了用户名及密码自定,其它均取默认值即可。
2、 webmin的启动与停止
webmin安装后以服务的形式运行(默认服务端口为:10000),启动与停止与其它服务类似。
启动:service webmin start
停止:service webmin stop
重启:service webmin restart
启动后用netstat -ant可看到10000端口已打开。)
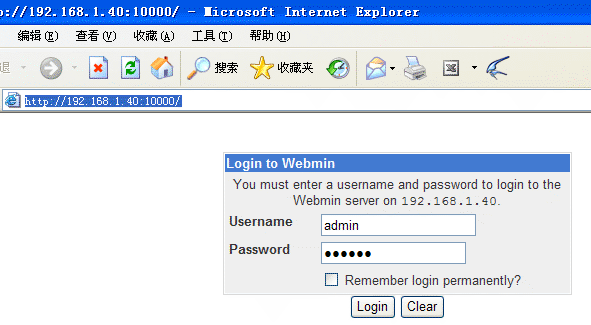
3、访问webmin
访问方法:http://网址:10000
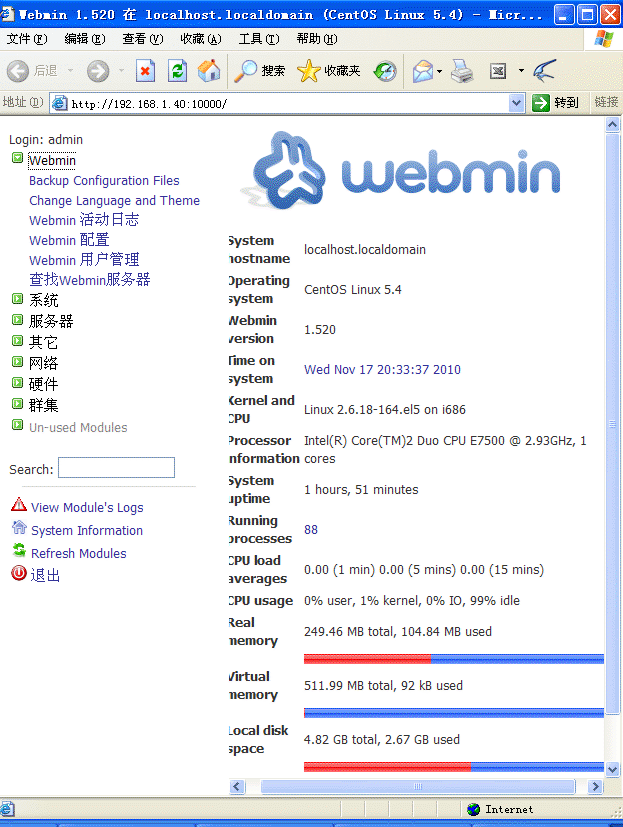
4、更改界面语言
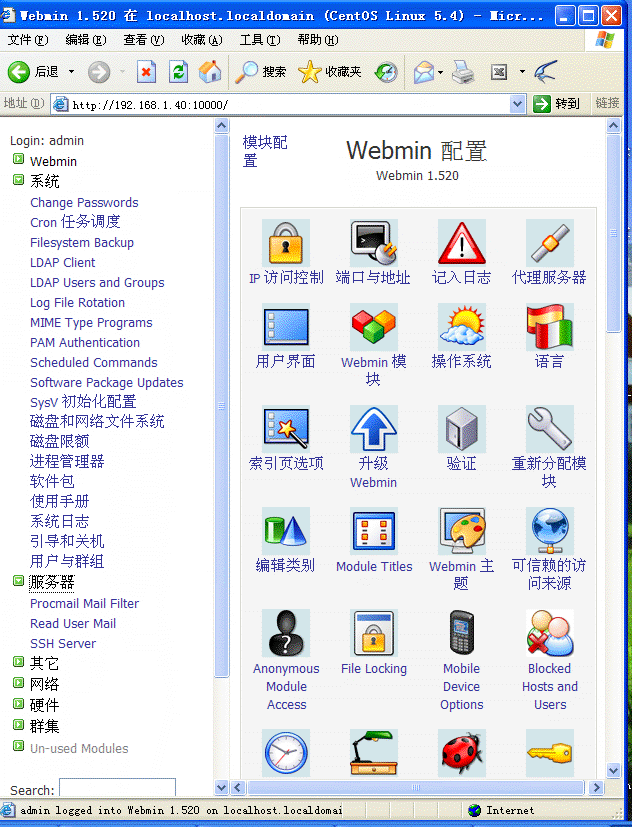
进入界面后(见上图),点击第一个图标“Change Language and Theme”,进入后在第一行“Web UI language”后面选中“personal choice”,并在下拉列表中选择“simplified Chinese(ZH-CN)
单击“Make Changes”按钮,单击“Return to index”链接即可
5、webmin 管理员口令的更改
例:将webmin管理员root的口令更改为222222
changepass.pl /etc/webmin root 222222 (changepass.pl 位于解压的目录,复制到任何地方调用即可)
其中 /etc/webmin是配置文件的路径,即安装时定义的位置.
查看安装步骤全部:
http://at.liuxinxiu.com/2010/11/image/webmin-1.gif
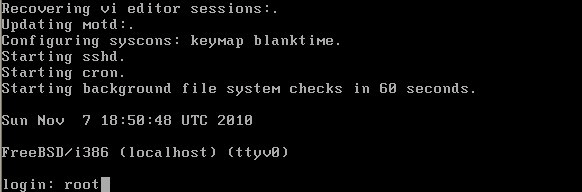
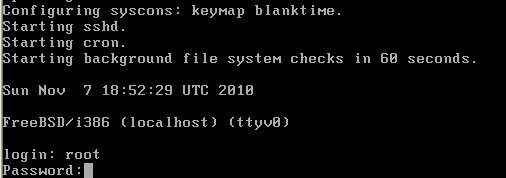
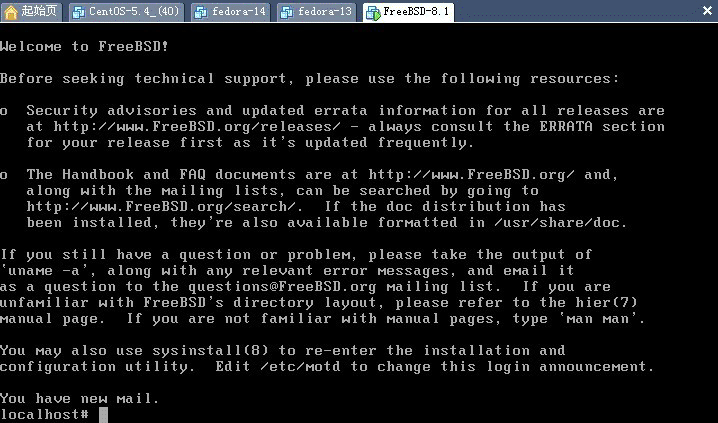
【原创】FreeBSD下设置root用户异地登陆sshd(附:FreeBSD SSH配置详解)
本次教程使用的是:FreeBSD-8.1
修改freebsd下可以用sshd权限可允许普通用户登录ssh, 但不能用超级用户root用户登录的方法!
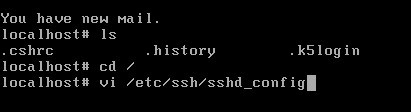
在/etc/ssh/sshd_config最后中加入
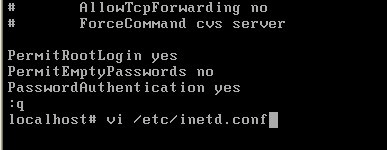
PermitRootLogin yes #允许root登录
PermitEmptyPasswords no #不允许空密码登录
PasswordAuthentication yes # 设置是否使用口令验证。
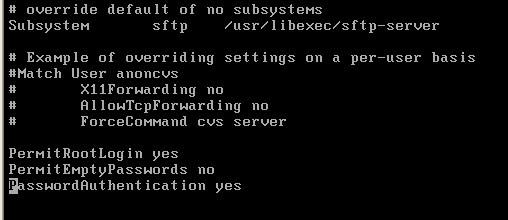
就可以了=========================================
之后再,vi编辑/etc/inetd.conf,去掉ssh前的#,保存退出 (开启监听ssh服务)

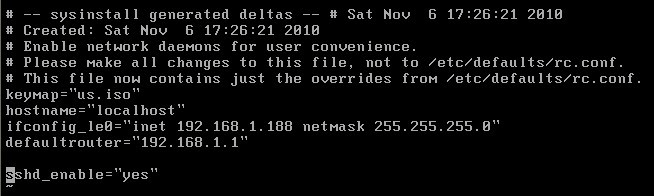
编辑/etc/rc.conf
最后加入:sshd_enable="yes"即可
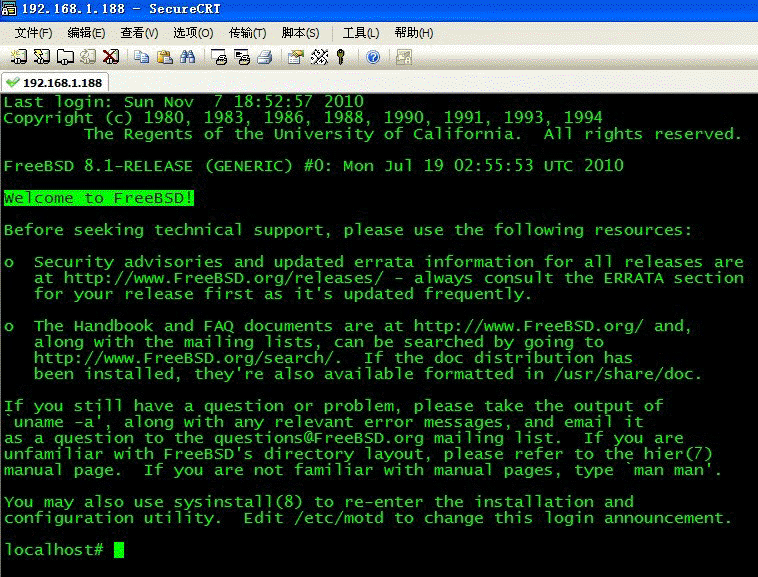
最后激活sshd服务:
techo#/etc/rc.d/sshd start
用下面命令检查服务是否启动,在22端口应该有监听。
#netstat -an ## check port number 22
===================================================================
***********************************************************************************
##############################################
记得修改完配置文件后,重新启动sshd服务器(/etc/rc.d/sshd restart)即可。
几点补充说明
1,如果重启后还是不行请重新载入sshd_config 文件
/etc/rc.d/sshd reload
2,如果出现using keyboard-interactive authentication
password:
请确认PasswordAuthentication是否已经改成yes
另外如果客户端是putty那么请确认"尝试'智能键盘'认证(SSH-2)"的勾是否有去掉
3,如果是使用root帐号登陆
请确认密码是否为空
空密码无法登陆
4请确认是否有安装SSH
sysinstall>>>configure>>>networking>>>sshd是否的勾是否有打上
【原创】freeBSD更改系统root密码,注:root安装系统默认为空
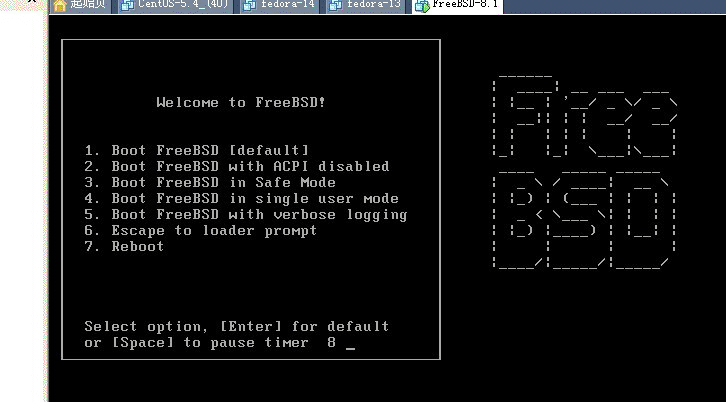
本次教程使用的是:FreeBSD-8.1
FreeBSD 5 之以后的版本,都按照如下步骤操作:
首先重启FreeBSD执行命令和linux一致:shutdown -r now

在系统启动提示以下画面时候按spacebar选择数字键:4 按enter进入单用户模式,图如下:
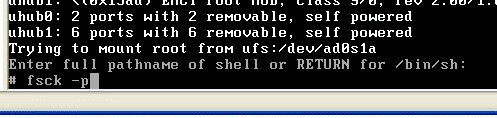
待系统运行至,提示以下信息时:
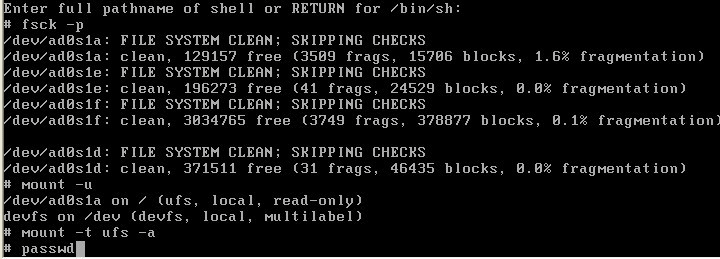
Enter full pathname of shell or RETURN for /bin/sh:
再按Enter进入单用户,提示
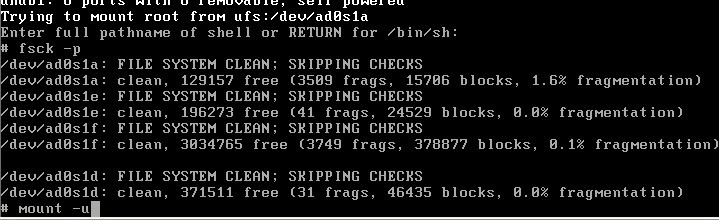
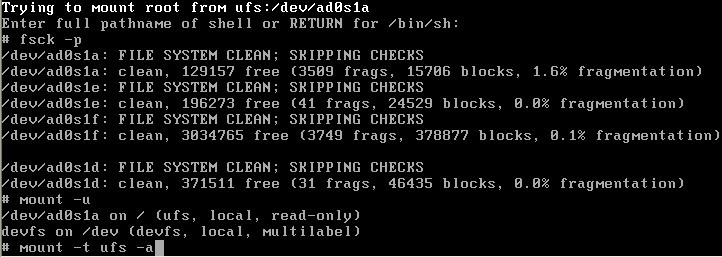
挂载档案系统,输入:
# fsck -p \\文件档案系统檢查
# mount -u / \\挂载 /
# mount -t ufs -a \\挂载所有文件档案
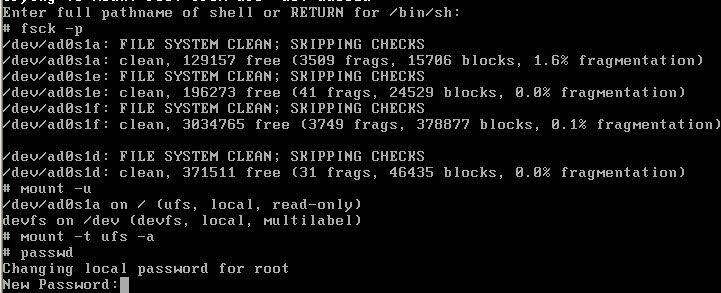
接下来开始重新设置root用户密码,输入:passwd 回车
# passwd \\更改密碼,
\\现New password: 时候键盘输入你想设置的密码,这里无*号提示,记住你输入密码的位数!
New password:
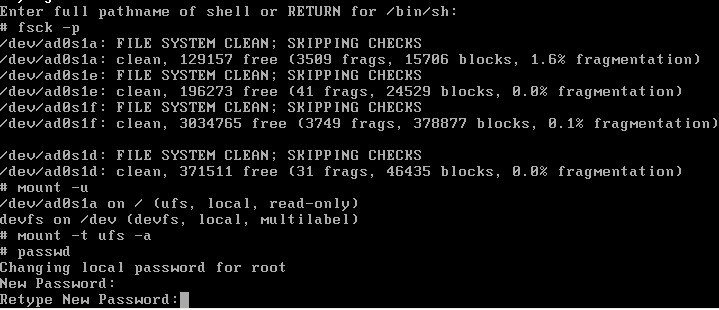
\\更改密碼,在出现Retype new password: 时候,键盘再次输入你上一步设置的密码!
Retype new password:
返回到以下界面说明设置成功!
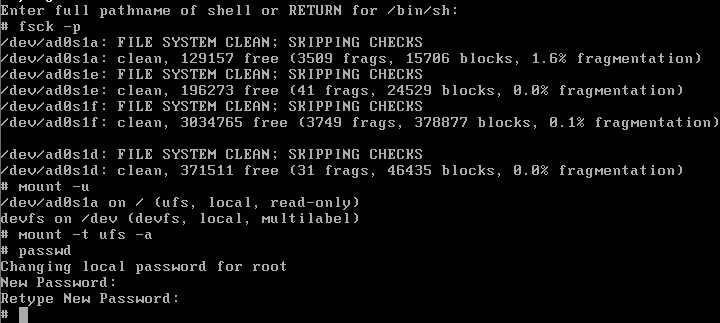
之后输入:exit 退出,重新加载多用户。
# exit \\离开单用戶进入多用戶正常模式,再次启动系统,root用户使用新设置的密码进行登入!
==========================================================================
验证完成!root用户进入系统的画面@!
==========================================================================
freeBSD 比较早的版本使用以下步骤:
==========================================================================
重置root密码其实很简单
第一步:重启服务器,在出现模式选择时,选择单用户模式 选择 4(Boot FreeBSD in single user Mode) 系统出现提示,按回车确认继续
第二步:输入 fsck -y (检查系统文件) 磁盘检查完成后,挂载所有系统分区
第三步:输入 mount -a
第四步: 重设root用户密码 输入 passwd 回车 之后会提示再输入一遍,确认后 Ctrl+D 系统继续启动,就可以了.
------------------------------------------------------------------------------------------------------
【原创】linux服务器更改DNS设置,Centos-5.4 让yum使用搜狐sohu镜像下载源
今日朋友买一北京VPS,本人帮其安装环境,先前YUM类库,出现无法解析域名,查看DNS设置得知问题所在。
粗心的机房管理员,设置好DNS也不测试下。
=============================================
详细更改如下:


进入/etc/ 打开DNS设置文件
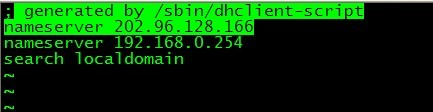
原来机房管理设置的DNS 202.96.128.166 为原来北京地区DNS经在本地WIN测试已经不可用!@
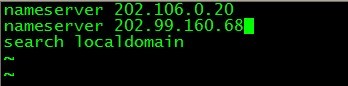
新设置为:202.106.0.20 / 202.99.160.68
主DNS:202.106.0.20 (北京DNS)
次DNS:202.99.160.68 (河北DNS)

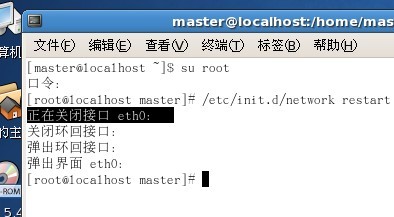
更改完成后,重启服务器即可,而不要使用重启网络配置命令:/etc/init.d/network restart
之所以不使用::/etc/init.d/network restart 重启网络命令是因为重启后会先关闭网络连接,此时SSH客户端已和服务器断开连接,导致启动服务无法发往服务器端。服务器所有网站将无法访问,SSH也无法连接@!
而选择重启服务器,再次启动机器时,会自动加载最新修改完的网络配置。
==================================================================

重启后,执行下载,可以完成!
之后删除 entOS-Base.repo 文件,或者备份成其他名称:
mv CentOS-Base.repo CentOS-Base.repo.bak
*****************************************
重命名:CentOS-Base-sohu.repo 为:CentOS-Base.repo
mv CentOS-Base-sohu.repo CentOS-Base.repo
*******************************************
现在使用 yum 就会选择国内搜狐开源镜像站!@
推荐 yum使用的CENTOS 国内镜像站点,单CD安装CENTOS
centos官方镜像列表
http://www.centos.org/modules/tinycontent/index.php?id=32
CENTOS 国内镜像
http://mirrors.163.com/centos/ (浙江省杭州市 电信,武汉电信访问快,竟提供最新的4.7及5.2)
http://mirrors.shlug.org/centos/ (上海市电信真如IDC机房,武汉电信访问慢)
http://mirrors.ta139.com/centos/ (移动线路,武汉电信访问快)
http://centos.ustc.edu.cn/centos/ (中国科学技术大学,教育网线路 -官方镜像)
http://mirror.centos.net.cn/ (北京市 网通, -官方镜像)
--------------------------------------------------------------------------------
CentOS USTC mirror
http://centos.ustc.edu.cn/centos/
--------------------------------------------------------------------------------
安装CentOS 4的方法:
下载CentOS-4.7.ServerCD.iso 单张光盘安装CentOS4.7,安装后可以用yum update升级,适合服务器使用
安装后请按照以下步骤修改CenOS-Base.repo,以后就可以方便的用yum安装软件了.
cd /etc/yum.repos.d
mv CentOS-Base.repo CentOS-Base.repo.save
wget http://centos.ustc.edu.cn/CentOS-Base.repo
修改以上文件后, 如需要安装gcc, 直接yum install gcc就可以了
--------------------------------------------------------------------------------
安装CentOS 5的方法:
下载centos/5.2/isos/i386/CentOS-5.2-i386-netinstall.iso,刻盘安装CentOS5.2,安装地方 设置为HTTP,Server centos.ustc.edu.cn, 目录 为centos/5.2/os/i386。
安装后请按照以下步骤修改CenOS-Base.repo,以后就可以方便的用yum安装软件了.
cd /etc/yum.repos.d
mv CentOS-Base.repo CentOS-Base.repo.save
wget http://centos.ustc.edu.cn/CentOS-Base.repo.5
mv CentOS-Base.repo.5 CentOS-Base.repo
为Centos5添加网易163、Sohu的yum源
将yum的目标服务器更改为中国大陆服务器镜像
以下的URL地址我都验证过了在当前完全可以下载,而且速度挺快.
mv /etc/yum.repos.d/CentOS-Base.repo /etc/yum.repos.d/CentOS-Base.repo.bak
vi /etc/yum.repos.d/CentOS-Base.repo
- # CentOS-Base.repo
- #
- # This file uses a new mirrorlist system developed by Lance Davis for CentOS.
- # The mirror system uses the connecting IP address of the client and the
- # update status of each mirror to pick mirrors that are updated to and
- # geographically close to the client. You should use this for CentOS updates
- # unless you are manually picking other mirrors.
- #
- # If the mirrorlist= does not work for you, as a fall back you can try the
- # remarked out baseurl= line instead.
- #
- #
- [base]
- name=CentOS-$releasever - Base
- baseurl=http://mirror.be10.com/centos/$releasever/os/$basearch/
- http://ftp.iasi.roedu.net/mirrors/centos.org/$releasever/os/$basearch/
- http://ftp.ncnu.edu.tw/Linux/CentOS/$releasever/os/$basearch/
- http://ftp.hostrino.com/pub/centos/
- gpgcheck=1
- gpgkey=http://mirror.centos.org/centos/RPM-GPG-KEY-centos4
- #released updates
- [update]
- name=CentOS-$releasever - Updates
- baseurl=http://mirror.be10.com/centos/$releasever/os/$basearch/
- http://ftp.iasi.roedu.net/mirrors/centos.org/$releasever/os/$basearch/
- http://ftp.ncnu.edu.tw/Linux/CentOS/$releasever/os/$basearch/
- http://ftp.hostrino.com/pub/centos/
- gpgcheck=1
- gpgkey=http://mirror.centos.org/centos/RPM-GPG-KEY-centos4
- #packages used/produced in the build but not released
- [addons]
- name=CentOS-$releasever - Addons
- baseurl=http://mirror.be10.com/centos/$releasever/os/$basearch/
- http://ftp.iasi.roedu.net/mirrors/centos.org/$releasever/os/$basearch/
- http://ftp.ncnu.edu.tw/Linux/CentOS/$releasever/os/$basearch/
- http://ftp.hostrino.com/pub/centos/
- gpgcheck=1
- gpgkey=http://mirror.centos.org/centos/RPM-GPG-KEY-centos4
- #additional packages that may be useful
- [extras]
- name=CentOS-$releasever - Extras
- baseurl=http://mirror.be10.com/centos/$releasever/os/$basearch/
- http://ftp.iasi.roedu.net/mirrors/centos.org/$releasever/os/$basearch/
- http://ftp.ncnu.edu.tw/Linux/CentOS/$releasever/os/$basearch/
- http://ftp.hostrino.com/pub/centos/
- gpgcheck=1
- gpgkey=http://mirror.centos.org/centos/RPM-GPG-KEY-centos4
- #additional packages that extend functionality of existing packages
- [centosplus]
- name=CentOS-$releasever - Plus
- baseurl=http://mirror.centos.org/centos/$releasever/centosplus/$basearch/
- gpgcheck=1
- enabled=0
- gpgkey=http://mirror.centos.org/centos/RPM-GPG-KEY-centos4
- #contrib - packages by Centos Users
- [contrib]
- name=CentOS-$releasever - Contrib
- baseurl=http://mirror.centos.org/centos/$releasever/contrib/$basearch/
- gpgcheck=1
- enabled=0
- gpgkey=http://mirror.centos.org/centos/RPM-GPG-KEY-centos4
=======================================================================
或者直接下载SOHU 163 开源镜像服务器的配置文件到当前目录:
或者直接下载163 SOHU 镜像服务区
====================================
wget http://mirrors.163.com/.help/CentOS-Base-163.repo
wget http://mirrors.sohu.com/help/CentOS-Base-sohu.repo
yum makecache
yum update
为linux添加ip或网卡的方法
ls ifcfg-eth0*
可以看到有
ifcfg-eth0
如果以前配过别的ip,可能会有
ifcfg-eth0:0
ifcfg-eth0:1
等等
如果没有,就编辑一个ifcfg-eth0:0的文件,如果有,就在最大数上加一。文件内容:
IPADDR=”192.168.0.10″
NETMASK=”"
IPADDR就是要加的新的IP,如果有多个连续IP,可以写成:
IPADDR=”192.168.0.10-11″
NETMASK=”"
文件编辑完之后,运行:
/etc/init.d/network reload
用ifconfig看新的IP是否已经加上。
如果是为第二块网卡配IP,在/etc/sysconfig/network-scripts目录下编辑一个ifcfg-eth1的文件:
DEVICE=eth1
ONBOOT=yes
BOOTPROTO=static
IPADDR=192.168.0.18
NETMASK=255.255.255.0
GATEWAY=192.168.0.1
修改一下IPADDR,NETMASK和GATEWAY的参数。
运行:
/etc/init.d/network reload
用ifconfig看新的IP是否已经加上。
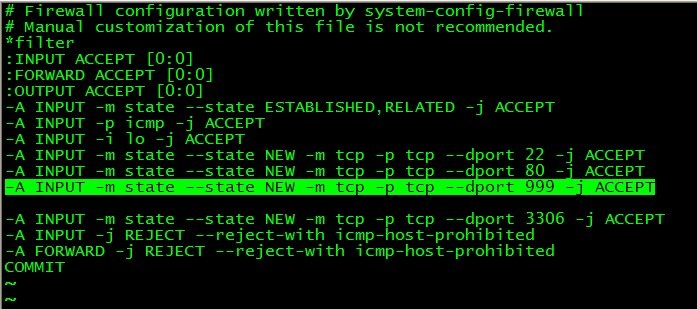
【原创】更改SSH默认22端口或增加SSH端口的修改方法
以下教程以Fedora-13 为例
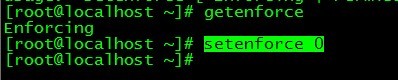
首先查看SELinux是否是开启状态,如果默认是开启先暂时关闭
// 查看SELinux的当前模式
# getenforce
// 设置SELinux的当前模式,1设为Enforcing,2设为Permissive
# setenforce 1|0
=====================================================
vi /etc/ssh/sshd_config

查找:#Port 22 去掉之前的# 并在以下新增加新端口999
Port 22
Port 999
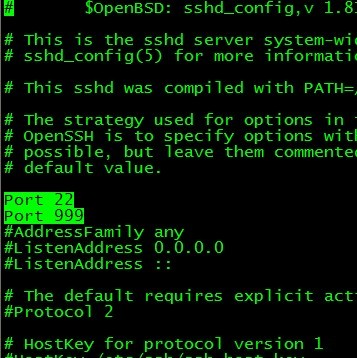
无论你是想增加新端口999 还说想更改默认22端口为999
建议先保存22和999 请先同时保存两个端口以避免修改中出现失误导致无法登入到远程服务器!
之所以先设置成两个端口,测试成功后再关闭一个端口,是为了方式在修改conf的过程中,万一出现掉线、断网、误操作等未知情况时候,还能通过另外一个端口连接上去调试以免发生连接不上必须派人去机房,导致问题更加复杂麻烦。
更改完成并保存!重启SSHD:
*************************************************************************************
service sshd restart 或者 /etc/init.d/sshd restart
*************************************************************************************
然后修改防火墙规则:
vi /etc/sysconfig/iptables
添加新端口:-A INPUT -m state --state NEW -m tcp -p tcp --dport 999 -j ACCEPT
*************************************************************************************
保存之后重启防火墙规则:/etc/init.d/iptables restart 或者 service iptables restart
*************************************************************************************
现在请使用ssh工具连接999端口,来测试是否成功。如果连接成功了,则再次编辑sshd_config的设置,将里边的Port22删除,即可。


